Showing posts with label DIY. Show all posts

Saturday, September 14, 2013

Little Pumpkin Baby Shower Part 3: Fall Decor

This Little Pumpkin Shower was so much fun to give. See the super cute invites here and the adorable pumpkin diaper cake here.

One of the hostesses found her inspiration for this super-cute pumpkin setup here.

Sweet Tea Sunsets: It's a Boy Banner


Another of the talented hostesses made a banner with the Little Pumpkin's name. She used jute to attach it to her wonderful fall mantle.
Sweet Tea Sunsets: Fall Baby Name Banner


Next up...food!

Saturday, September 7, 2013

Little Pumpkin Baby Shower Part 2: Pumpkin Diaper Cake

I've had a lot of questions about this diaper cake from the shower.

It IS made completely of diapers (and rubber bands)!


Here's a quick illustrated tutorial (because of course I didn't take pictures as I was experimenting). 

Pumpkin Diaper Cake

You'll Need
Diapers (see below for details)
Rubber bands - thin larger ones are better
Orange Tulle
Brown Tulle/Fabric Scrap
Green Wired Ribbon

Step 1: Pick your diapers. I used Pampers (mom's choice) in sizes 1 and 2 (per mom's request). Really the size and pattern of diaper don't matter as they'll be covered with tulle for this cake. I ended up using about one box for this project (some 1s and some 2s). 

Step 2: Roll your smaller diapers. Leave them folded, and start from the open/top end. Roll toward the crease. This seems to hold the diapers in place better. If you're making a cake without tulle, it'll give you a pretty white diaper (with most brands). 


Step 3: Add a small rubberband around each diaper roll. I do about 10 of these at a time before going to the next step.


Step 4: Bundle about 5 diaper rolls together and start forming a circle for your cake.


Step 5: Add 1-2 big rubber bands around your large bundle. This can be as large/small as you'd like. There's no real exact number count it has to be. 


Step 6: Stack two bundles of approximate equal size on top of each other. Don't try to line them up like in the illustration, because you'll go crazy. Stacked is good enough.


Step 7: Add bulk to your pumpkin to make it more of a sphere instead of a cylinder. Use rubber bands to attach 1-2 rolls to the stacks. Just mess with them until they look right. That's the real secret to this project. When in doubt, add more rubber bands.


Step 8: Take your larger diapers (still folded but not rolled) and layer them around the outside of your cake, overlapping so you can't see the rolled diapers. Tuck the bottoms under the cake and use rubber bands to secure. You may need one rubber band toward the top and one toward the bottom.


Step 9: Do the same to the top so you have a pumpkin-shape. If it still looks like a cylinder, add more rolls under the flat diapers or flat diapers in the middle area.


Step 10: Wrap the diapers in tulle. I found that wrapping North and South worked best. This takes a LOT of tulle to get an opaque look-just fyi.


Step 11: Add a stem to the pumpkin and tie green wired ribbon around the top for the vine. I used one diaper roll covered in brown tulle. I just worked it down into the top of the pumpkin.


Ta-da! Sorry for the illustrations instead of actual photos. 

Tuesday, August 27, 2013

Little Pumpkin Baby Shower Part 1: Invitations

Last fall, prior to my blogging hiatus, my friends and I threw a gorgeous Little Pumpkin baby shower for one of my best friends. She was due end of October, so it was a perfect way to celebrate the Fall! Here is our inspiration board on the Pin website.

For invitations, we decided to go custom with the Little Pumpkin theme. Off to HobLob/Mike's I went to search high and low for rustic, fall, boy-appropriate papers.


I created the invitation (as usual) in powerpoint. I consider this the ghetto-rigged version of invitation-creation, but hey-it works.


Our inspiration papers were deep brown glitter, baby blue, mustard, burnt orange, and copper in solids and graphic prints. My personal favorite combination is the mustard graphic print with baby blue accents!


The great thing about this is the endless possible mix-and-matches. We took full advantage of this!


More to come!

Thursday, August 22, 2013

Made it to Sugar Land

Well we made it to Sugar Land back in July. Here's a run-down of our escape from the Lbk. I would like to point out that this was a solo exit as Travis had moved down early to start work. Not too shabby of a schedule considering I was herding cats (literally) while accomplishing the move.

Packers/movers arrived at 7:15a.
Closed on house at 9:00a.
Finished loading house at 1:00p.
Finished loading storage at 2:00p.
Left Lbk by 2:05p.
Rockwall by 8:45p.

Bye West Texas!


Stayed with my parents in Rockwall for the 4th of July.

Had my obligatory peach ice cream fix from Ham's.


Mr. Baxter thoroughly enjoyed learning all about giant cats called "dogs."


We created an etsy-ripped (sorry!) wreath. Not a huge fan of mesh wreaths, but this one was too cute to pass up. Also, every single part could be bought at HobLob, so we pretty much had to make it.


Re-packed, drove, and checked into our townhome Friday.

I did not take quite the advice on the new home box as literally as I should have. We made some makeshift wine glasses with our Lbk wine while waiting for the movers.


When our stuff was loaded in Lbk it was on a truck that looked like this.


Perfect. No worries about fitting that sucker in the apartment parking lot. Should be a quick trip as there were only two households packed. Wrong. This showed up to unload.


Thankfully, the tree was only a minor casualty, and I don't think we angered too many neighbors. Also, I won at unpacking BINGO pretty darn quickly if I do say so myself. Even the movers were asking about the status of my BINGO card.


The cats promptly decided it was time to explore their new fireplace ending in a ceremonious first bath within the first 2 hours.


Worry not. They've settled in just fine.


We made it!

Tuesday, August 20, 2013

Moving Tips

We were very fortunate to have such a wonderful company for Travis to join. They covered cost of storage, arranged for accommodations for Travis before the townhome was ready, and arranged packing and moving of all our stuff.

We had packers/movers for this move, so this list is more of a prep list. 

Moving tips:
1) Only move 1/3 of your "stuff."
This goes back to the rule of thirds: Sell 1/3, Trash 1/3, Move 1/3. We found it to be quite helpful.

2) Sell, sell, sell.
Craigslist isn't what it used to be back in the good ol' days. But...it's great for a) large pieces of furniture, b) tools, and c) bulk sale. Make a realistic monetary goal for selling. For us it was: Sell enough stuff to buy a nice new couch. Garage sales are good and easy if you priced as you packed/cleaned. By the time we pre-sold furniture/garage sale items the furniture buyers also wanted we didn't have enough left for a true "garage sale" so we bulk listed the remainder for a low price. Or just follow step 3.

3) Trash, trash, trash.
When in doubt, if you wouldn't buy it at a garage sale, trash it. Invest in some large lawn leaf bags. Always have one set up in the house so you can toss as you pack/clean. I've found if it's convenient to throw stuff away, I will do exactly that. Some communities have ordinances for throwing stuff away in dumpsters. Know the rules. You can normally find these on city websites.

4) Prep for packers.
Everyone says: "Oh, you have packers?! That'll make moving so easy!" Well, not for those of us who are neurotic. My tips for packing for packers:
  -Baggies. All sizes. Buy them. Desk clutter? Throw it in a baggie. Makeup stuff? Throw it in a baggie. Junk drawer? Throw it in a baggie.
  -Set aside a spot for stuff that's going with you. Mark it off with signs and a clear boundary. Tell the packers as soon as they arrive.
  -Painters tape. Anything that was staying was marked with a painters tape X with "STAYING." This will, hopefully, cue your packers to question you if they start to pack something with an X. I also used this to mark cabinets I had already pre-cleaned out.
  -Group items. Put like items together so the packers don't have to think about it.
  -Ask them to label in a certain way. We had some books on a book shelf. I left a post-it that said "Top 2 Shelves together labeled "LAW" and Bottom 2 Shelves together labeled "SPEECH"." They'll try to accommodate you most of the time.
  -Let the packers know about valuable/important items. For us, the only real item of super importance was my hope chest. I had specific instructions for how it should be packed/moved because it held delicate antiques/memories. Upright, no tilting past 45*, nothing on top.

5) Label everything.
Permanent markers are your BFF. Consider using a "strange" color for marking boxes each time you move. This way, even if the box has something written, you know exactly which list is from this move. Be as specific as you can. Include:
  -What room it's from in the old house.
  -Where it goes in the new house.
  -Category of what's in the box.
  -List of items in the box.

6) Make a moving essentials box.
This should include things for as you're packing/moving. Keep it in a central location and always return items to it. Mark it with signs so packers don't pack it. Good things to include:
  -Family binder with healthcare/insurance/real estate info.
  -Moving roster with names/phone numbers of movers, packers, storage, etc. Also, a place to keep your paperwork from the movers during the move.
  -Extra tape
  -Permanent markers
  -Box cutter

7) Make a new home box.
This should include necessities for before the movers arrive. It goes with you in your vehicle to your new home. Good things to include:
  -Toilet paper (2 rolls)
  -Paper towels (1 roll)
  -Clorox wipes (1 pkg)
  -Scissors
  -Pot holder (1-if you plan on cooking anything at all)
  -Paper goods (paper plates, cups, plastic silverware, etc.)
  -Bath towels

8) Move your vacuum yourself.
If you're near as concerned about gross-nasty stuff as me, you'll want to move your vacuum yourself. I asked our movers to pack it so it would be the first thing off the truck. My thinking was: Travis will coordinate movers while I quickly vacuum the floors before they get too much stuff in. Wrong. Our stuff got packed and repacked, so the vacuum was waaaaayyyy in the back. Ew. Also, I underestimated how badly I wanted to vacuum our new place as soon as we arrived.


Sunday, October 21, 2012

Cute as a Pumpkin!

Just a quick stop in to share the CUTEST diaper cake! I may be a little biased, but this one is just too sweet!


Update! I added a tutorial here


Yup! It's totally made of diapers (even the stem)! It's wrapped in orange and sparkle brown tulle for a pumpkin-y finish. I was surprised how easy this was to make. Just roll diapers like a regular cake and use flat diapers on the outside to shape. Add some tulle and curly ribbon for a vine. Ta-da!

Monday, August 13, 2012

Getting Ready for Fall Football!

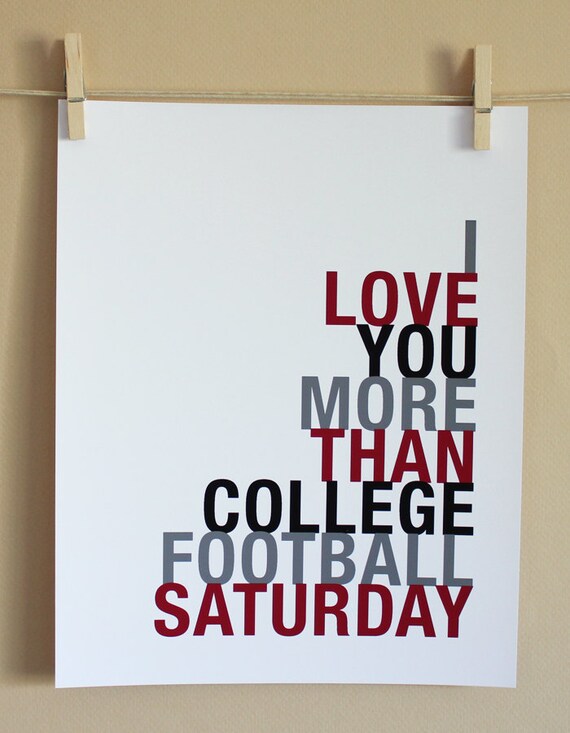
I think this poster on Pinterest pretty much sums up the football season. Of course, I love my husband more than anything. College football Saturdays are pretty fun, though. Love seeing lots of people and enjoying food, fellowship, and football.


In preparation for football season I put together this awesome wreath!

To make this wreath, I used the tutorial for a red burlap wreath found here. The only modification was that I didn't cut the ends of my squares and instead used a technique for folding more like the book page wreath tutorials out there. I also left some of the stray "hairs" from the burlap on. I like the rugged look.

For the letters, I painted the edges white and the tops got a coat of black and a coat of glitter black paint. For those of you who watch Texas Tech football, you know the famous helmets - I call them "black sparkle helmets." These letters are "black sparkle helmet" inspired.

Perhaps I'll make another similar one soon and take some better pictures as I go. For now, Enjoy these few pictures with my awesome camera!


Sunday, April 1, 2012

Spring Bunny Baby Shower Part 4: Wishing Tree for Baby

I love Spring. Only slightly more than Winter. There is absolutely nothing like a cool Spring night. I also love all the new growth. I also own zero Spring decorations. I have enough Christmas decor for three houses. Go figure.

Thankfully, one of my wonderful co-workers offered to host the shower at her lovely home. She has Spring decorations. Beautiful ones at that. In fact, she made a super cute rag wreath for her front door just this year. Anyway, add some fun touches with a beautiful home and you end up with a beautiful shower.


I just love this wishing tree for Baby W. My co-worker had a "less-than-living" tree in her front yard that she "borrowed" a branch from. Add in some silvery spray paint, rocks, and a cute vase...voila!


The instruction card is worded like this: "Please take a moment to write a wish for Baby W... on the back of one of these birdies. Then, place the birdie on the tree for A... and A... to read now and Baby to read later."


The wishing birdies were cut with a Silhouette in some cute pink paper. They were too cute!
PS- I love those bunnies with the tulips. Too cute!!

Sunday, March 25, 2012

Spring Bunny Baby Shower Part 3: Diaper Cake

So, I feel like I do the same thing for every baby shower, but diaper cakes are stinkin' cute! You can see my first official attempt at making one here.

For this cute spring bunny shower, the color scheme was pink, grey, and white (to make sure our decor matched Baby's room). My co-workers and I made this diaper cake in about 45 minutes from start to finish (not including the sock-flowers that were made by another co-worker).


We started with a 14", 10", and 6" cake round. We used Size 1 and Size 2 diapers and a ton of rubber bands. There's tons of tutorials out there, so I won't bore you with the details.


Tips for a Cute Diaper Cake

  • Use labeled diapers (like swaddlers) or mark your diapers with different colors of rubber bands (e.g., reds=size 1, blue=size 2). This takes the headache out of Mom's task of unrolling.
  • Carefully roll your diapers. I've found that rolling from the open end to the closed end results in a more uniform roll. 
  • When forming your cake, make sure the "seam" of the rolled diaper is on the inside. This makes for a much more uniform cake.
  • Lots and lots of rubber bands to hold groups of diapers together.
  • Squish it until it looks right. Keep pushing on your diaper groups until they make the shape you want.
  • Fill in the middle of your cakes with anything you want: extra diapers, baby gifts, tissue paper, etc.
  • Use tulle by the roll to contain your diaper layers. They sell super cute sparkly, lacy, and shimmery tulle rolls at that HobLob place.
  • Use paper shred as "filler" on top of each layer to hide the diaper tops. This also helps hide any cardboard from the cake rounds. Plus it's cute.
  • Add cute baby stuff.